niedziela, 5 lipca 2020

Cromwell - Winged hussar, 1st Polish Armoured Division Black Devils


The Polish 1st Armored Division was the most famous Polish unit in all Second World War history. It was created in February 1942 at Duns in Scotland under Major General Stanisław Maczek command. The division started its battle route in the Normandy and finished in Wilhelmshaven. Mainly they were fighting as part of the First Canadian Army. Until 1947 they were located in north-west Germany and in June the division was disformed.

In last months I focused on modern subject but after some gaming in World of Tanks where I have Cromwell in my garage, I turned my eyes for this vehicle in 1/35 scale. It was obvious for me that the model must represent some Polish vehicle but I needed the unique idea to execute. I decided to create very dynamic scene with speeding tank and some German troops escaping from the road.

I can say that this small vignette is my tribute to those Polish soldiers who fought those days. After the battle of the Falaise Pocket Canadians commented: "Bloody Poles, what a job!" These words of appreciation were the most important reason for me to build this Polish Black Devil's Cromwell.

The history of Cromwell is well know so here I will focus on the building stage mostly. 
There is no other possibility than just buy Tamiya's kit. So I did. To enriched it I completed some aftermarket parts:
- Friulmodel tracks
- Eureka XXL towing cables
- PanzerArt spare wheels
- RB Model gun barrels and antenna mounts

Some scratch build parts needed to be added if we want to bring the kit to the higher level. They were mostly from my old PE sets, furthermore some wires were used to replace the plastic handles but I also added dozens of plastic bolts on the kit and to the tacks. It was quite frustrating and time-consuming but with RP Toolz Punch and Die set the work was much easier than it could be expected.
Next, starting the painting I took my Tamiya's paints and using the instruction from the kit I prepare the mix in proportion given by the producer. As always in my models the base color was highlighted by adding couple drops of yellow to the base shade. Small elements were enlightened also but for this purpose I used fine brush. 
The markings were done with stencils and with some standard decals given in the box. In addition I had some special stickers for Polish version of Cromwell (thank you Tomasz!). 
The weathering stage was done quickly with chemicals provided by Wilder. The washes and filters created a lot of diversity in all panels of the kit but I decided to build more colors with oil paints. Using them I also prepared some dirt and filth stains. 
The chipping work was done with standard technique basing on the sponge and 3/0 brush. 
The final pigmentation I did also with Wilder's products with final touches of 502 Abteilung oil paints.

The stowage set were collected from wide range of different products. They are mainly resin with some cardboxes, ropes and chain. 
In the end I prepared the Hessian net with a piece of bandage, sheet of yellow note paper and super glue. It was long work but the result is really good. It was easy to bring proper shape and create wind in those hair!

The base was build with balsa wood with styrofoam inside. The road stones were cut from cork and glued with white glue. In the corners I added some soil with grass. 
The escaping Germans come from MasterBox set (German Signals Personnel) but I changed the heads for resin ones the same as some elements of equipment which come from Dragon range. The ranks were Archer's dry decals.


czwartek, 11 lipca 2019

Rebellion - ZSU-57-2


The Syrian civil war that is happening at the moment is, next to the Ukrainian war, the most recognizable conflict we can see day by day in the news. So it is also the inspirational for all modellers who build modern vehicles to show their models in scenery seen in the pictures from this region.
When I was asked to build some urban looking vehicle I intended to set it in the Syria. I had Trumpeter’s new ZSU-57-2 on my shelf so I started to look for the pictures of this vehicle. Truly speaking it was really hard to find good pictures and existed ones are mostly useless for my project. I found only couple shots taken in discussed region; there are also some good walkarounds. So based on those I needed to start my creative powers and complete this project with stuff I had in my boxes.

The main idea was to show the ZSU as a main subject with company of 3 or 4 figures. For the background I wanted to use Macone Models resin and plaster products – different types of walls with metal doors and asphalt section. The highest point was some pole with telephone wires which is typical and often seen in the pictures the same as satelite antennas. 


The full s-b-s- article was published in Tanker.


sobota, 15 czerwca 2019

Mörser Bär


It is not so popular as the rest of German military vehicles; even among the so called ”paper panzers” it is far away the spearhead. When the kit was released I did not even check the review because of the subject which suppose quite boring for me. The time flew and I did not bother of this one. Out of the blue my friend asked me to build this vehicle for his collection with free hand in finish appearance.


Well, in my standard procedure before the parte were cut from the sprues I started to look for ideas and interesting camo scheme. Quite fast I met the pics of Adam Wilder’s superb Bär which was my inspiration, especially for the building but also for the painting stages. But the most important was to find some interesting colors for this project. All of the painting charts I saw in the books and in the internet were unsatisfactory. I felt that they were not suitable for my project. Then I found my E-75 kit from 2015 where I painted all sections in different colors and finish. That was it!


The idea was to create the vehicle which was taken to the service right after it was fully movable and armed. This is why I left the tools and small elements in the spare box. In the matter of colors I wanted to build multicolored model with factory unfinished surfaces and some freshly painted yellow camo. The steel areas were planned to be painted in different manner to simulate two conditions: storage circumstances (rust) and various sources of origin.  
As the additional elements I planed to add Wilder’s dry stencils and Verlinden’s German wall slogans.


When I was thinking about the storage and checking different elements I realized that there is no space on the superstructure to add any. The towing cables and wire tied to the hooks would be enough this time. The tarpaulin on the roof was the only super addition.


środa, 27 lutego 2019

ZTZ-99A Pixeled King


Technical
The ZTZ-99A was developed in design offices as the third generation battle tank designed for Chinese People's Liberation Army and it is the further development of 99's family. According to experts the ZTZ-99A is in a leading position in the world in terms of firepower, defense, maneuverability, and information technology.
To speed 54 tones to 80 km/h on the roads and to 40 km/h cross-country it needs 1500 hp water-cooled engine. The three members of the crew operate this steel beast - commander and gunner sit in the turret when the driver in the front and centre of the hull. They use 125mm stabilized cannon as the main armament which is loaded with autoloader and can detect, identify and locate the target at up to 5 km. The standard anti-aircraft 12,7mm gun is located on the turret. It has also 7,62mm coaxial machine gun.
It has the hull which is similar to T-72. The front the same as the turret is covered with additional modular armour plating which can be replaced shortly in case of damage. The crew is equipped with NBC solutions the same as anti-incendiary system. The vehicle has smoke grenade launching system as well as laser facilities necessary on the modern battlefield.


Kit
I was impressed after the box was opened because in comparison to the previous kits from this producer, this one is the best. The sandy colored plastic sprues consist detailed suspension, track links, nicely detailed hull with stowage boxes, photo-etched grilles on the engine deck and rear exhaust, rear-mounted fuel containers, armor blocks on hull glacis plate, detailed turret with armor blocks and main gun with thermal sleeve. There is also clear sprue with lights and glasses for electronic devices.
Just a notice about the three-piece track links - first I thought they will be a nightmare but it should be said that the designers made their job perfectly. With the special tool provided with the kit we can build them really fast and the fitting is extremely good. The only thing I would like to have is a choice to have steel set and the one with rubber pads. As I noticed in the pictures the steel tracks are used in the field mainly but there are exceptions and the rubber boots are seen there too.
The decals sheet provide stars and numbers for the parade unit. You can use them for no risk if you build this version of the kit but If you would like to create the tank in the maneuvers it will be better to find bigger stars and some letters.
The only camouflage which is correct for this tank is shown on the color plate added to the kit - so you need to pixelize of you kit. 


Idea


When the kit arrived I was wondering what to do with it and how to show it in interesting way. I was sure that "parade option" is not for me and it needed something more realistic and dusted than polished and shiny toys. So my idea was to put it on light slope and simulate the working chassis. I needed to remember about this during the building stage. This is why the kit does not leveled and the tracks look quite strange without the terrain.


Final thoughts
I thought that it will be stressful and hard work. But it became quite differently. I can say that this kit can be highly recommended and should be a great addition to each modern tank collection.

I would like to thank to Xiang Zhu, Jacques Duquette and Lester Plaskitt for help and comments during this build.

You can find full article with s-b-s- pictures in Military Modelcraft International.


poniedziałek, 18 lutego 2019

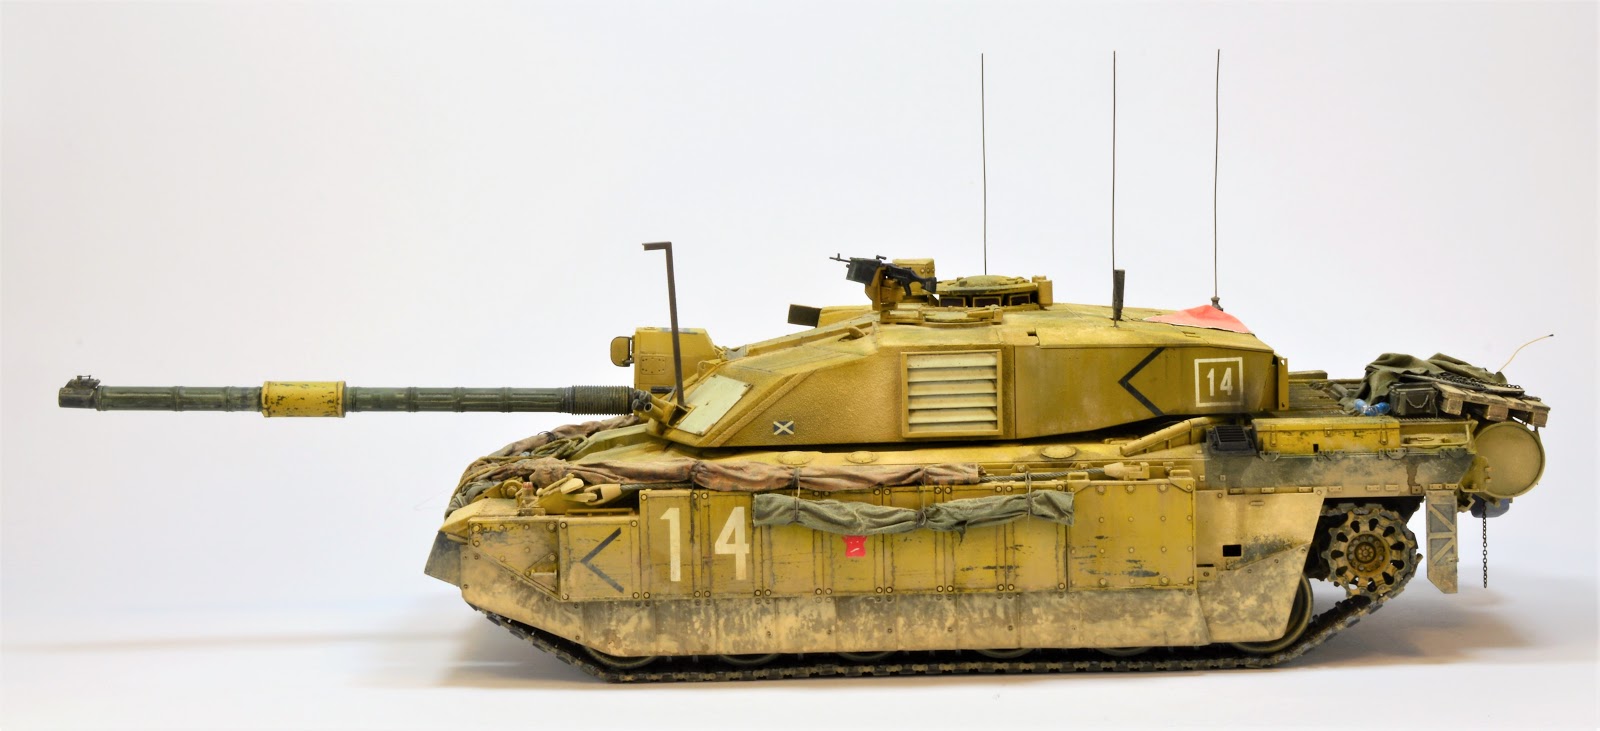
Desertised - Challenger 2

Facts
This is the tradition to start the article with some history and technical information so I do n ot want to breake the rule and here they are.
The FV4034 Challenger 2 is a British main battle tank (MBT) designed and built by the British company Vickers Defence Systems. It is in service with the armies of the United Kingdom (since 1998 and it is expected to be in service until 2035) and Oman.
The Challenger 2 is equipped with a 120-millimetre 55-calibre long L30A1 tank gun, the successor to the L11 gun used on the Chieftain and Challenger 1. Unique among NATO main battle tank armament, the L30A1 is rifled, because the British Army continues to place a premium on the use of High-explosive squash head (HESH) rounds in addition to armour-piercing fin-stabilised discarding-sabot rounds. The Challenger 2 is also armed with a 7.62 mm chain gun and a 7.62 mm machine gun. Fifty eight main armament rounds and 4,200 rounds of 7.62 mm ammunition are carried.


Kit
As I remember I always like the look of Challenger 2, espesially in desert version with the long rubber curains on the sides. The make the vehicle so massive and impressive so I decided to build this one someday. Fortunately friend of mine wanted to sell his kit for very good price. It was almost ready and needs only some small portion of work. I bought it and started to finish as soon as it arrived my home.
Truly speaking the kit is huge. I know it is big but in reality it was bigger than I expected. Awesome!
The kit is the standard quality  of Tamiya. This is the words which explains everything for each modeller who though once build their kit. The sand coloured plastic along with clear parts are enough to make you smile after the box is open. The vinyl tracks are also good. To complete the list I need to mention about the poly caps, some nylon cord, coper wire, plastic card, a pair of nuts and bolts for idler arms and a sheet of decals with options for 3 vehicles seen during Telic operation. 


Idea
So, now what I wanted to achieve was the dusted vehicle with some additional stuff but not to much because it was really hard to attach the crew’s stuff on the flat surfaces of the tank. Before I started to paint the kit I collected some basic stuff I wish to compose on the model. To add some markings I have the sheet from the kit and some additional decals from Bison Models which were also helpful because I decided to mix them and breake the one shade of the vehicle with colorful additions. I also wanted to present the kit on some simple base -  just black plastic top and wooden (balsa) frame with the pictures and some name. I added the Union Jack sticker too. 


Components of the project
Despite the kit is very good I decide and have the possibility to make so changes. First I replace the vinyl tracks for the separate links from Bronco (AB 3523). Next I used couple parts from Voyager’s PE set (one of their first – the quality was far away from current products they offer), some Eureka XXL metal ropes (the endings were taken from the kit) and resin tarpaulins. The rest of the elements were scratch build – I based on the references pictures I managed to find in the internet.


Final thoughts
Well, one of my favourite tanks were added to the „done kits” list. It was pleasure to build it and finish in dust. It is a really good part of the collection because of its size and final layout. I hope that it was not my last modern British vehicle!


poniedziałek, 1 października 2018

Ace of Spades - T-72


The story of T-72 was told thousand times and the plenty of books were written by the specialists.  Also hundreds of internet pages describe this vehicle. So, why is it so popular? Because of the technical ability,  firepower or maybe its combat history? I do not think so! In my opinion the answer is quite easy - because of its amount. Almost 20,000 units were produced so far. The T-72 was exported widely and saw service in 40 countries. Some improved variants are still being built for export customers.

The war in Donbass is still on. Truly speaking the diversity of tracked and wheeled vehicles used by both sides of this conflict is the perfect inspiration for all fans of Russian military models - cars, APCs, tanks, self-propelled artillery and many more are in the modelers range.
Here I would like to present the newest Trumpeter's kit 05599 prepared as the separatist tank signed as the Ace of Spade from Viking Battalion.

Preparation stage
Because of the reasons I mentioned above I wanted to build this kit in typical green finish but with some interesting finish. After the searching in collection of battlefield pictures I found the serie of Ace shots taken by Gennadiy Dubovoy. They were good enough to decide to use them as the references. Fortunately Echelon prepared the decals set with stickers based on the same pictures I used to build the model so it was obvious that I will build this specific tank.

Components of the project
To enriched the kit with some additional elements I decided to use:
- Masterclub tracks MTL 35049;
- RB Model gun barrel  35B102;
- Eureka XXL towing cables ER-3537
- RB Model antenna rod and mount 35A14;
- Voyager PEA211 and PEA202;
- Echelon Decals D356201;
- Eureka XXL Modern Universal Tent and tarp sets E-022, 023, 024;
- Arkebuza Barracuda net;
- RB Model chain;
- Paper Panzer Production wooden box;
- Plus Model plastic bottle.

The driver figure comes from Alpine Miniatures (35131) with Hornet head and the rebel soldier was produced by Evolution Miniatures (35104).

The base was completed with:
- Eureka XXL concrete road panels;
- Macone telegraphic pole;
- PanzerArt, Meng and Verlinden barrels;
- RB Model transport pallets.

Kit
Truly speaking this was one of the best kits I ever build. And I am not writing it to make any kind of  advertisement for Trumpeter. This is the truth. Of course there are some small mistakes but they have no influence to the final appearance of the kit and for my opinion. I can say - "extremely recommended!"

Building stage
The good fitting and well detailed elements resulted with smooth building process. Even the preparation of Kontakt-1 bricks was easy and fast work. But the biggest surgery operation was the surroundings of the drivers visor - I needed cut it out and build it from the beginning because of totally different shape.

Let’s play with colors!
For the main colors I used the AK paints released as the Modern Russian Colors vol.1 and vol.2. They were applied on the black primer airbrushed earlier. The detail's finish was done with Vallejo Model Color and with LifeColor on the rubber rims.

Decals
The Echelon Decals provides very good set of Novorossian T-72B1s markings (there are also 2S1s and a BMP-2) that were been seen in action against the Ukrainian forces in the eastern Ukraine. The set comes with two antenna flags.

Drops of chemicals and pinch of pigments
The main role in the weathering stages was played by Wilder chemicals. As I use them for couple of months I can say that they are a bit different than other brands but have evident advantages - it is needed to learn how them use properly to achieve nice results but truly speaking the learning process is very fast and simple.  

Additional stuff
I treat the additional stuff on the models as my trademark so here I could not make an exception. To realize this I use Eureka XXL new resin sets of tarp and tents, Akrebuza's barracuda net and Paper Panzer Production stunning wooden box. In addition I put some dirty rags, rope, wires and Plus Model plastic bottle.


Diorama
To set the whole scene I use simple photo frame 20 x 26 cm and balsa wood. It was enriched with ace of spade card, St.George ribbon, small pictures of the real tank and the descriptions (stickers).
The ground work based on the Eureka XXL concrete road panels and scratch build cable reels. The highest point of the base, the telegraphic pole, comes from Macone resin set.
To finish the overall view I used the barrels, some wooden planks and cables and pipes.

Figures
Both figures were painted with acrylics.


The end
I build this kit and its surrounding quite fast - 5 weeks of work give the result you can see here. I’m really satisfied with the result. This kit was nice to build and hope to meet another Trumpeter kit on my way!
I would like to thank Maciej Góralczyk , Piotr Wypiór and Ronin Ira from  Military Equipment Of Conflict in Ukraine Facebook group.